A high-pass filter cuts the low frequencies below a point you choose and lets everything above it pass through. That's the whole idea. It's one of the first tools most people learn, and it's also one of the most overused.
So let's keep this practical. I'll cover what a high-pass filter actually does, how the two controls work, and when to reach for one — plus the mistakes that quietly thin out a lot of home mixes.
TABLE OF CONTENTS
What a high-pass filter actually does
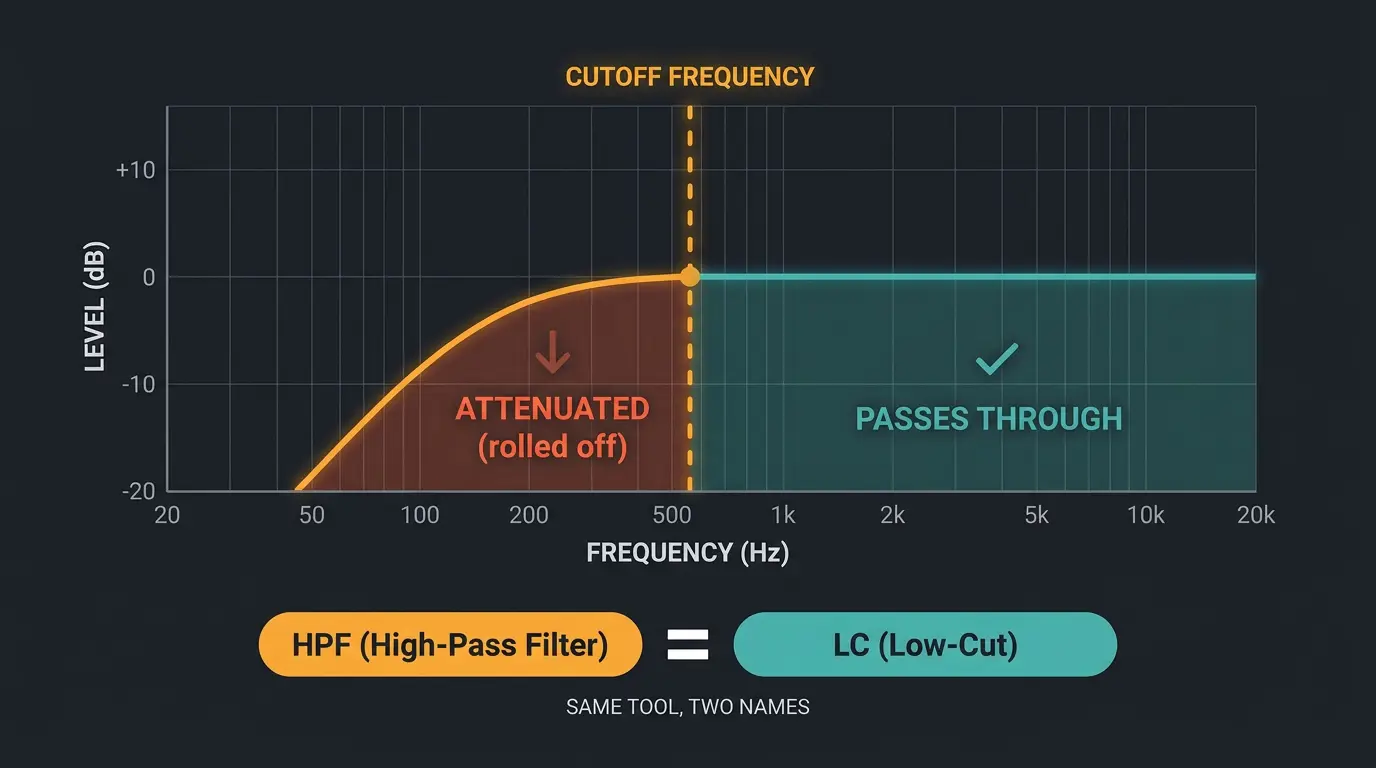
A high-pass filter attenuates the frequencies below a set cutoff and lets everything above that point pass through untouched. Feed it a signal, pick a frequency, and the stuff underneath gets rolled off.
Here's where the naming trips people up. It's called a high-pass because it passes the highs. But on a lot of gear and plugins, you'll see the exact same tool labeled "low-cut" instead. Same process, described from the other direction — one name focuses on what passes, the other on what gets cut.
Both terms are correct, and you'll run into both. So don't overthink it. If you see a button that says HPF or one that says LC, they're doing the same job.
The two controls that matter: cutoff and slope
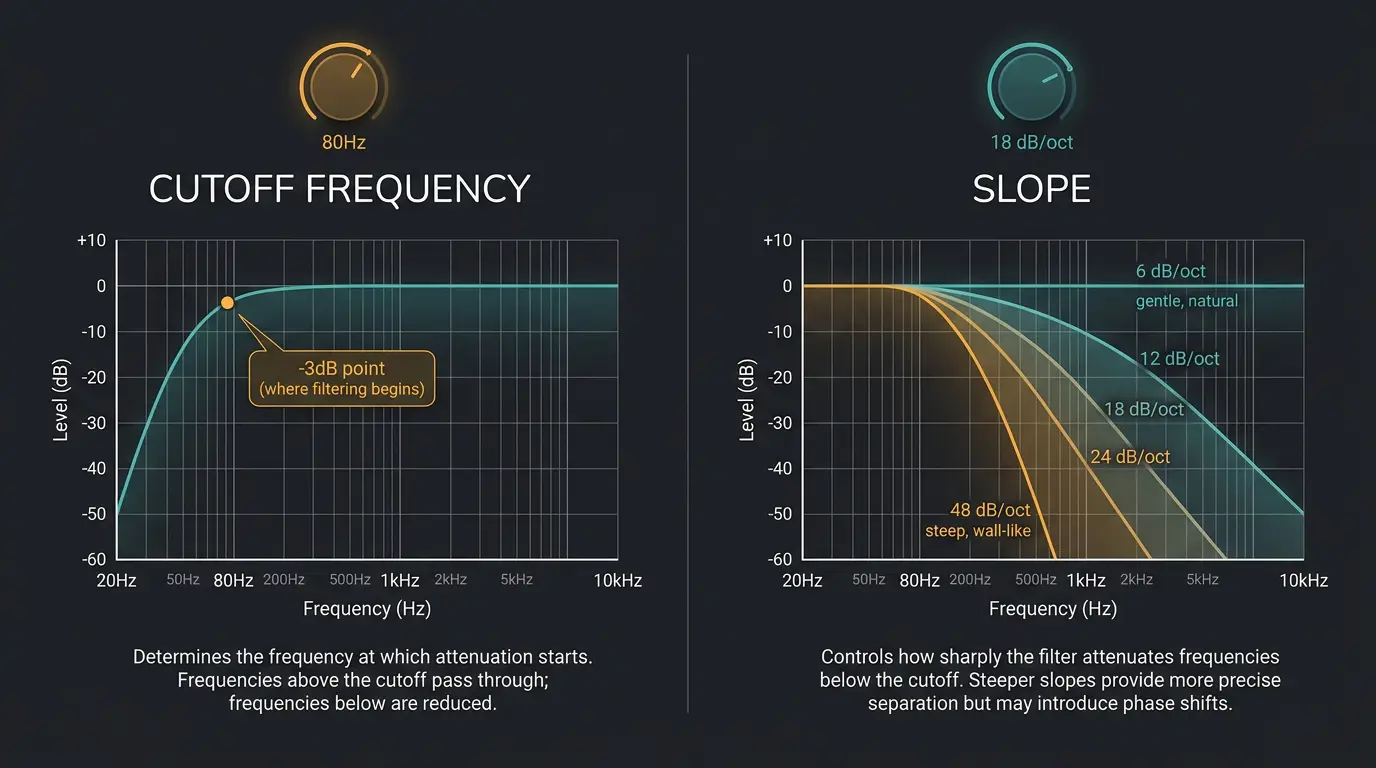
There are really only two knobs to understand here.
The cutoff frequency is where the filtering kicks in. Technically it's the point where the signal drops by 3dB — not a hard wall, but the spot where the roll-off gets going. Set it to 80Hz and the filter starts easing out everything below there.
The slope is how steeply it rolls off, measured in dB per octave. Common values are 6, 12, 18, 24, and 48 dB/octave. A gentle slope like 6 or 12 eases the lows out and sounds natural. A steep slope like 24 or 48 cuts hard and fast, almost like a wall.
There's no universally right choice. A gentle slope preserves more warmth near the cutoff; a steep one clears space aggressively. Let's give it a listen both ways on the track in front of you and trust your ears. If you want to go deeper on shaping frequencies overall, our EQ cheat sheet is a good companion to this.
Resonance and filter shape
Some filters add a little resonance bump right at the cutoff — a small boost of level at the exact point where the roll-off begins. It can add character, or it can poke out in a way you don't want. Just be aware it's there and listen for it.
Different filter designs sound different too. You'll see names like Butterworth thrown around, and each has its own personality in how smoothly it transitions. I won't drag you through the math. The takeaway is simple: not every high-pass sounds identical, so if one feels off, try a different filter type and listen for that little bump near the cutoff.
When to reach for a high-pass filter

Here are the everyday situations where a high-pass earns its keep.
- Cleaning rumble and noise off vocals. A scenario where this is useful: you tracked a vocal near an AC unit or a rumbly floor, and there's low-frequency junk hanging under the take. A high-pass around 80–100Hz clears it out without touching the voice.
- Taming proximity effect. When a singer gets right up on the mic, the low end swells. A gentle high-pass reins that in so the vocal doesn't sound boomy. This pairs well with the ideas in our guide on how to mix vocals.
- Clearing mud and low-end buildup. When a bunch of tracks all carry energy down low — guitars, keys, pads — it stacks up into mush. High-passing the ones that don't need those lows opens the mix.
- Tightening a busy arrangement. The more tracks you have, the more the low end fights for space. Trimming the bottom off the non-bass elements gives your kick and bass room to breathe.
With that being said, not every track needs one. Blindly high-passing everything is a common mistake, and it can do more harm than good. Reach for it when there's an actual problem to solve, not out of habit.
Common mistakes to avoid
The most common one is high-passing the kick and bass too aggressively. Those tracks live in the low end — that's the point of them. Cut too much and your mix gets thin and weak, and you'll wonder where the power went.
The second is applying a high-pass on autopilot to every single channel because someone online said to. That's not mixing, that's a reflex. Some tracks want their low end.
The third is setting the cutoff by eye instead of by ear. It's tempting to watch the analyzer and drag the filter to some number that looks right. But the analyzer doesn't hear the song. Set it, then close your eyes and move it until the track sits better. Less is more here — a little goes a long way.
One more thing: check your work in mono and on a couple of different systems. And if your levels jump when you engage the filter, that's normal phase behavior — Sound On Sound has a clear explanation of why high-pass filters can cause clipping worth reading.
Static vs dynamic high-pass filtering
A standard high-pass is static. It's always on, cutting the same amount no matter what's happening in the track. That works fine most of the time.
But dynamic EQ and adaptive filters take it a step further. Instead of cutting the lows all the time, they only engage when the low end actually gets out of hand. A scenario where this shines: a vocal where the rumble only shows up on certain low notes or heavy breaths. A static high-pass would thin out the whole take to fix a problem that only appears now and then. A dynamic one leaves the vocal alone and clamps down just when it needs to.
For anyone who thinks this needs fancy outboard gear — it doesn't. In-the-box tools handle dynamic filtering as well as anything out there. If you want the full picture on how frequency-dependent processing works, our guide to multiband compression covers a related idea.
Quick takeaways
- A high-pass filter and a low-cut filter are the same thing — one name describes what passes, the other what gets cut.
- Set your cutoff by ear, not by habit or by staring at the analyzer.
- Don't gut the low end of your kick and bass — those tracks need their bottom to hit.
Frequently Asked Questions (FAQs)
What's the difference between a high-pass and a low-cut filter?
There's no difference — they're the same tool. High-pass describes it by what passes through (the highs), and low-cut describes it by what gets removed (the lows). Manufacturers just pick one label or the other. If you see HPF or LC, they do the exact same job.
What cutoff should I use on vocals?
Start somewhere around 80–100Hz on a typical vocal and adjust by ear. That clears rumble and proximity buildup without thinning the voice. Deep male vocals may want it lower, brighter voices can go a touch higher. Sweep it up until the vocal loses body, then back off.
Should I high-pass every track in my mix?
No. High-passing everything on autopilot is a common mistake that can leave your mix thin and lifeless. Use a high-pass when a track has low-end junk or is crowding the bottom of the mix. Some tracks want their low frequencies, so leave those alone.
What's the difference between a high-pass filter and a low-shelf?
A high-pass rolls the lows off completely below the cutoff, heading toward silence. A low-shelf only reduces (or boosts) the lows by a set amount and then levels off. Use a high-pass to remove low content and a low-shelf to gently shape it while keeping it present.
Does a steeper slope always sound better?
No. A steeper slope cuts harder and clears more space, but it can sound less natural and add a resonance bump near the cutoff. Gentle slopes preserve warmth around the cutoff point. Neither is right or wrong — pick the one that serves the track and trust your ears.
Final Thoughts
A high-pass filter is a simple tool that solves real problems — rumble, mud, proximity boom, crowded low end. The trouble starts when people treat it like a rule instead of a fix. It's not magic, and it's not mandatory.
Make sure you're using it because a track actually needs it, and set that cutoff with your ears open. Do that, and your low end will thank you.
Some of the links within this article are affiliate links. These links are from various companies such as Amazon. This means if you click on any of these links and purchase the item or service, I will receive an affiliate commission. This is at no cost to you and the money gets invested back into Audio Sorcerer LLC.